In this second of a series of articles on conducting a root cause investigationwe explore a key investment every investigator should make: understanding the problem before defining a solution! Unfortunately, investigations often begin by brainstorming possible causes and prioritizing them for further analysis – leading to a trial and error approach resulting in a prolonged, expensive, and often failed investigation. With Step 1 we try to truly understand the performance problem.
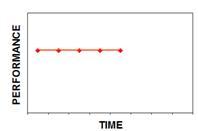
An investigation is directly related to measuring performance. When we measure performance we hope to see a fairly steady, predictable result (Figure A). Occasionally, however, that performance drops (Figure B).
 |
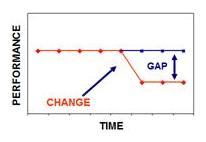 |
A drop in performance happens because something changed. To find and eliminate that change we conduct an investigation.
The Model
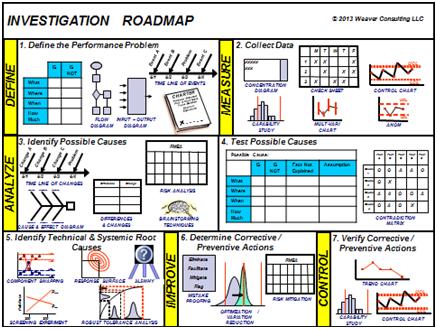
Figure C is our model for the investigation – the Investigation Roadmap. In our initial article we generally described the overall investigation. Today we’ll explore Step 1.
Step 1: Define the Performance Problem
With Step 1 we try to truly understand the performance problem. I will discuss the 3 sub steps that should always be followed in a typical, important investigation.
- Describe the Problem
- Describe the Process
- Identify the Inputs
To illustrate the investigation I will use a simple example. A “widget” is assembled, placed into a pouch, the pouch is sealed, and the batch sterilized and released. Customers are complaining that some of the pouches are open upon receipt.
Sub Step 1: Describe the Problem
I recommend an IS / IS NOT Diagram to fully describe the performance problem. By asking a series of IS / IS NOT questions regarding the what, where, when, and how much of the open pouch we gain a greater understanding of the issue and place limitations on the investigation.
Figure D provides the answers to the “where” questions of the IS / IS NOT Diagram for the open pouch issue.
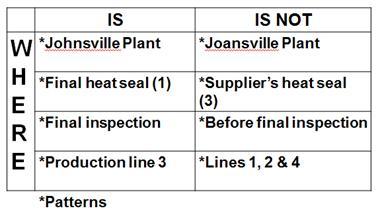
Already we can see limits to the investigation. Although the widget is produced in both our Johnsville and Joansville plants, customers are only finding open pouches in product coming from the Johnsville plant. The only seal that is open is the final seal that we put in place on our production line. (When we purchase the pouch it already has three seals the supplier has made and none of them are observed as open by the customer). We are now looking for this problem inside the Johnsville Plant and although we are not finding any open pouches, we have instituted a pull test on the pouch during final inspection and have found that some pouches do open before the required pull test value of 10 pounds of force has been reached. We are not finding weak seals before final inspection because no one has looked for this yet. Finally, we observe that the pull test failures only occur on pouches from production line 3 even though the exact same product is also produced on line 1. A different product, (we’ll call it a “wazzoo”) is produced on lines 2 & 4. The wazzoo is also packaged in pouches but has never received a customer complaint for open pouches. We have also initiated pull tests on the wazzoo pouch but those pouches are meeting the pull test requirements.
With this investigation each pair of where statements has been identified as a pattern. These patterns are clues which will help us find the change that caused the open pouches.
Sub Step 2: Describe the Process
It is equally essential for the investigators to understand each process under investigation. In our example the production process is one of the processes being investigated. The best way of describing a process is to flow chart it. Figure E is the flow chart of the production process.
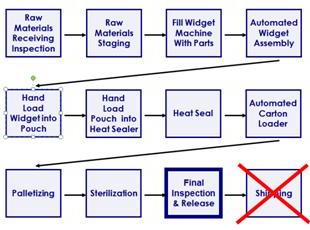
I have highlighted the final inspection step since this is the earliest point in the process where a seal is observed not meeting the required 10 pound pull strength test. We will investigate all steps of this process up through the final inspection step.
The change we’re looking for may be a change to one of process steps. If the investigators don’t understand what the process steps are they probably will not find this change.
Sub Step 3: Identify the inputs
The best way of identifying inputs to the process are identifying the inputs to each step in the process. For example, the Input-Output Diagram in Figure F shows the key inputs to the heat seal step as identified by the heat seal subject matter experts.
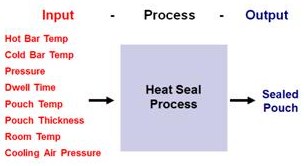
The change we’re looking for may be a change to one of the inputs. For example, suppose the operator incorrectly set the pressure to 20 psi instead of 30 psi and this change caused seals to be open. The investigators will probably never find this change unless they understand that the pressure setting is a key input to heat sealing.
Summary
We have invested some time and money to understand the issue under investigation. We are now able to:
- Describe the problem in detail using an IS / IS NOT Diagram;
- Describe each process using a process flow diagram; and
- Identify the key inputs to each process step.
We have also observed several patterns in the IS / IS NOT Diagram which may be significant clues to unraveling our mystery.
With Step 1 we have clear direction. However, we must proceed with caution!
- Is the information we’re working with 100 percent accurate?
- Do we really have all the information we truly need?
I have never conducted any investigation where all the information provided up front was 100 percent accurate and complete! However, in my early days I blithely moved forward in whatever direction the information indicated, only to realize days (or weeks) later that some of that information was incorrect and precious time and money had been wasted. I will never do that again. Therefore, in our next article we will make a second investment: Collect Data.


